[ SSH 자동 로그인, SSH auto login ]
1. Client-side operation using PuTTY
클라아언트측 작업
> Key generator screen, 키 생성기 실행 화면 (puttygen.exe)

> Press Generate button, 키 생성 (키유형/비트수 선택)

> Generating key on progress, 키 생성 진행
It is created by pressing generate and moving the mouse.
generate를 누르고 마우스를 좀 움직여주면 생성된다.

> Completed to generate key, 키 생성 완료

> Save Private key, 비밀키 저장

> Convert Private key to "OpenSSH" format, 비밀키를 "OpenSSH" 형식으로 변환
Conversion -> Export OpenSSH key

서버측 작업
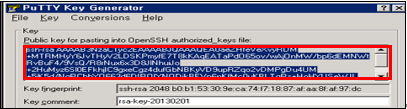
> Copy the generated public key, 생성된 공개키 복사
> Distributing the public key to the account, 서버의 사용하고자 하는 계정에 공개키 배포
1) Check that the ".ssh" directory exists in the home directory of the account
사용하고자 하는 계정(weblogic)의
홈디렉토리에 “.ssh”디렉토리 존재 확인.
If the ".ssh" directory does not exist, create it (owner = weblogic, permission = 700)
“.ssh” 디렉토리가
존재하지 않으면 생성 (소유자 = weblogic, 퍼미션 = 700)
2) Save the copied public key to the file "~weblogic/.ssh/authorized_keys”
“~weblogic/.ssh/authorized_keys” 파일에 복사한 공개키 저장
If the "authorized_keys" not exist, create it (owner = weblogic, permission = 600)
만약, 파일이 없으면 생성 (소유자 = weblogic, 퍼미션 = 600)
> From the client to the server, connect using the weblogic account.
클라이언트에서 서버로 weblogic 계정을 사용해서 접속하여 확인한다.
> Login test using plink that is putty's command line ssh utility
(ex) plink –i private_key_file account@server_ip
# plink –i ./id_rsa.ppk weblogic@10.10.10.100

No comments:
Post a Comment